
You know that moment when your air fryer’s mid-cook and suddenly the kitchen fills with a thin, acrid haze? You open it, the smoke alarm’s twitching, and the chicken wings aren’t even close to done. You’ve scrubbed the basket religiously.
You’ve soaked the rack. So what’s still triggering the smoke? Look up.
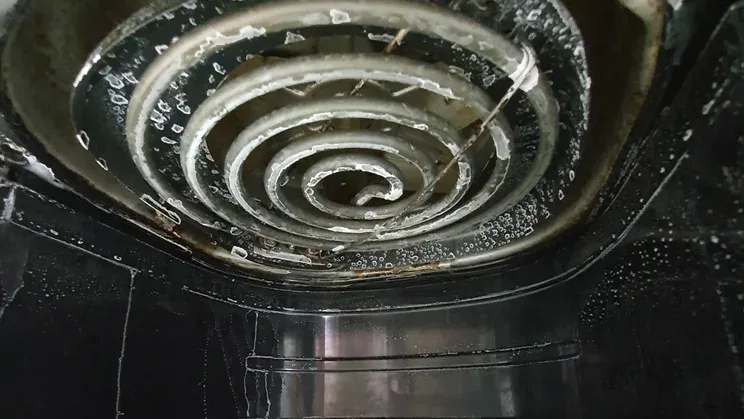
Tilt the whole unit back and look at the ceiling inside the cooking cavity. What you’re seeing, coated in a shiny, amber-brown glaze, is the reason you searched “how to clean air fryer heating element” in the first place.
Every batch of bacon, burgers, or fatty salmon you’ve cooked has sent a fine mist of oil upward. It lands on the heating element and the fan guard, then bakes into a stubborn, carbonized layer at 400°F. Manufacturer guidelines from brands like Ninja and Cosori, current as of 2026, are clear on this point: the heating element and the area around it require regular attention.
Skip it and you’re drifting into burnt-smell territory and, in worst cases, a genuine fire risk. The fix isn’t complicated, but it does demand a careful, visual approach.
Quick Answer
To clean an air fryer heating element, first unplug the unit completely. Let it cool for at least 30 minutes. Tilt the appliance back and locate the coil on the ceiling.
Brush away loose debris with a soft dry brush. Wipe the coil and mesh guard with a barely damp microfiber cloth. Use mild dish soap if needed.
Dry everything fully before plugging it back in.
Why Your Air Fryer Suddenly Smokes (It’s Almost Always the Heating Element)
Here’s what’s happening up there while you’re busy keeping the basket spotless. Foods with any meaningful fat content release tiny oil droplets into the superheated air. The powerful fan blows those droplets everywhere inside the chamber.
Most settle right on the heating element and the metal guard around it. Over five, ten, maybe fifteen cooks, that film thickens. It polymerizes.
It turns into a varnish-like layer that smokes the instant the element kicks on for the next preheat.
The basket itself rarely causes true smoke. Loose crumbs burn off fast and stop. Grease on the coil burns continuously, producing a steady, nose-stinging haze.
Aggregate user reports across cooking forums are remarkably consistent on this. Someone will be dead certain their unit is defective, only to discover a layer of neglected gunk on the top coil. The good news?
Once you address that hidden buildup, the smoke stops immediately. The appliance returns to its original odor-free performance.
Identifying this as the source is straightforward. If smoke appears during preheating or within the first few minutes of cooking, your element is the culprit. If it only happens later in the cook, it might be the food itself scorching.
But early-cycle smoke points upward every time. Routine upkeep of all surfaces, not just the removable parts, keeps the appliance running cleanly.
The Quick Visual Check: Grease, Crumbs, or Something Worse?
Before you grab any tools, do a quick assessment. Tilt the air fryer backward so you’re looking directly at the interior ceiling. Good lighting helps enormously here.
You’re scanning for three distinct types of buildup, and each needs a slightly different approach.
- Loose crumbs and flour: These look obviously dry and flaky. They often cling to the fan guard or sit in corners around the heating element bracket. A soft dry brush dislodges these in seconds. Nothing wet needed.
- Sticky amber grease: This is the most common offender. It looks glossy, tacky, and ranges from honey-colored to deep brown. You’ll see it coating the metal coil itself and the mesh guard. It feels sticky to the touch, not hard. A damp cloth with dish soap handles this.
- Carbonized black residue: This is old grease that’s been baked repeatedly until it’s hard, matte black, and stubborn. It resists a simple wipe. You’ll need a baking soda paste and a bit of patience to lift it.
The type you’re dealing with dictates your next move. A quick check also tells you whether the mesh guard is fixed in place, secured with screws, or fully removable. Most popular basket-style air fryers as of 2026 use a fixed guard held by a few screws.
Oven-style units often have a more exposed element on the back wall, making access physically easier but visually harder to inspect. Knowing your particular layout shapes the cleaning path ahead.
What’s Actually Up There? Heating Element Types and Guard Designs You’ll Spot
Things look a little different depending on your model. Understanding what you’re seeing prevents the single biggest mistake people make: treating every air fryer like it has the same internal anatomy.
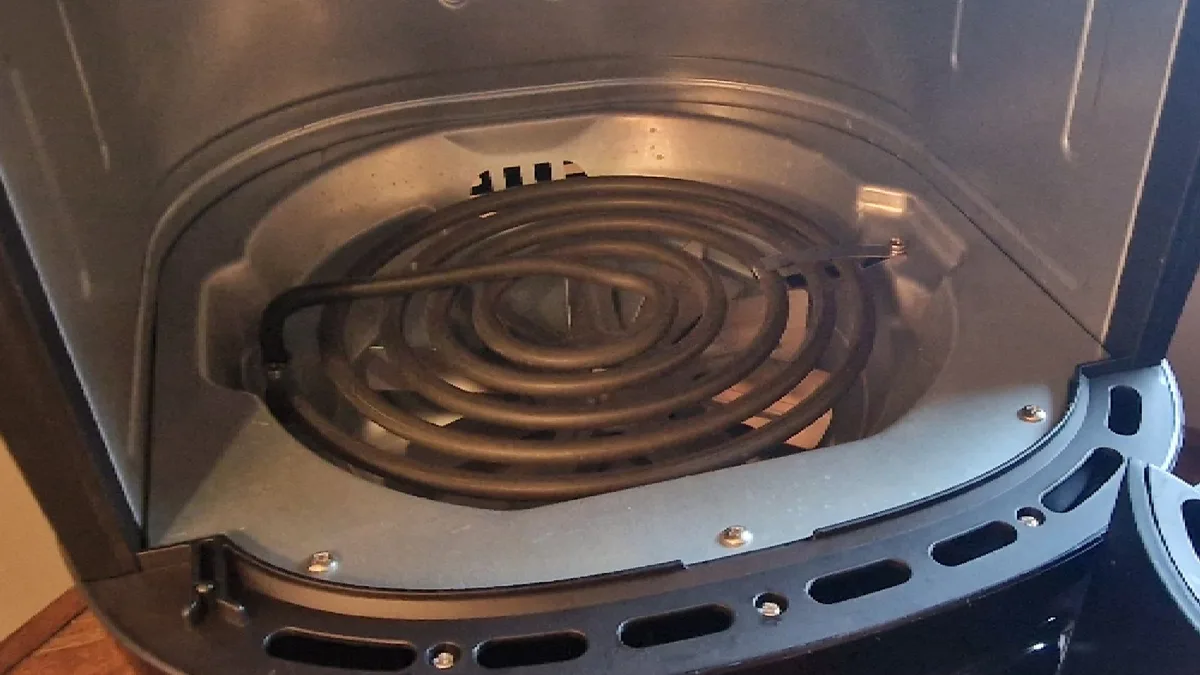
Metal Coil Elements (Most Common)
This is the serpentine, curved, or circular metal tube that runs across the top of the cooking cavity in basket-style fryers. It glows faintly orange during operation and sits behind or above a perforated metal guard. The coil itself has small gaps and bends where grease loves to collect.
You can gently wipe around and between the coil loops, but never bend or force them. The metal is rigid but not indestructible.
Quartz Heating Elements (Less Common)
Some higher-end and oven-style air fryers use straight quartz tubes instead of coiled metal. These look like glass rods housed inside a protective metal cage. They heat faster and clean differently.
Quartz is far more fragile than metal coil. You should never apply any scrubbing pressure directly to a quartz tube. A very gentle wipe with a damp cloth is the ceiling.
If baked-on carbon is bad, steam-loosening is safer than any abrasive method.
Mesh Guard Variations
The guard is what you’ll spend most of your time actually cleaning. Its job is to protect the element and fan from direct food contact while allowing airflow. Three configurations dominate:
| Guard Type | How to Identify | Cleaning Access |
|---|---|---|
| Fixed with screws | Small Phillips-head screws around the guard perimeter | Remove screws to lift the guard fully off for deep cleaning (check manual first) |
| Fixed, no screws | Riveted or press-fit into the ceiling panel | Clean in place only; never pry it off |
| No guard | Element fully exposed on the back wall (oven-style) | Direct access but fan and wiring may sit nearby |
Manufacturer documentation for brands like Ninja, Cosori, and Instant typically provides the definitive word on whether the guard is user-removable. Checking the manual for your specific model is worth the five minutes. Proper placement during use also affects how much grease accumulates on these components, since restricted airflow can worsen buildup.
Before You Touch a Thing: The Non-Negotiable Safety Sequence
You’re about to reach into an electrical appliance with cleaning tools. Skip a step here and you’re risking a shock, a burn, or an expensive paperweight. The National Fire Protection Association consistently flags unattended and improperly maintained cooking appliances as leading causes of kitchen fires.
That starts with basic electrical safety.
Step one: Unplug the unit. Not just turned off. Physically unplugged from the wall outlet. No exceptions, no shortcuts.
The power button does not break the circuit the way you need it broken for this job. You’re tilting the appliance, potentially introducing moisture near electrical components, and reaching into spaces that aren’t designed for routine consumer contact. Unplug it.
Step two: Let it cool completely. A heating element can hold dangerous heat for 20 to 30 minutes after the cycle ends. Touch the coil before it’s fully cold and you’ll get an instant, painful burn. Leave the basket out and the cavity open to speed up cooling.
A full 30 minutes is the safe minimum. If you cooked at 400°F just before, give it closer to 45.
Step three: Position it for safe access. Once cool, move the air fryer to a stable, well-lit countertop area. Lay down an old towel or some paper towels underneath. Tipping the unit backward to look up at the element can scratch your countertop otherwise.
You want both hands free and good visibility. A headlamp or phone flashlight aimed upward makes a dramatic difference.
Step four: Keep moisture controlled. The number one way people ruin air fryers during cleaning is by letting liquid run into the fan motor or electrical housing. Never spray any cleaning product directly into the cavity. Never pour water onto the element.
Every cloth you use should be wrung out until it’s barely damp, not wet. Think “damp sponge after drying dishes,” not “wet washcloth from the sink.”
Following these four steps takes under a minute once the unit is cool. The UL standards that govern these appliances assume proper user care. Any cleaning method that ignores this sequence voids that assumption.
Step-by-Step Cleaning That Matches Exactly What You’re Looking At
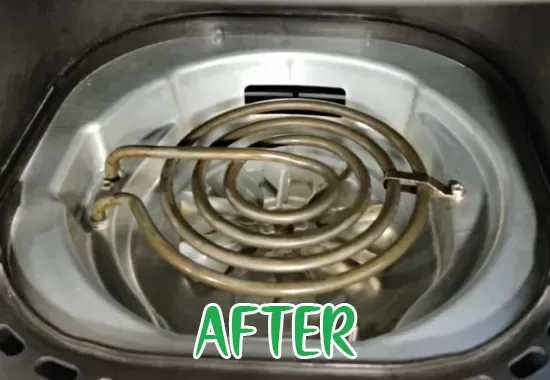
You’ve identified the type of residue. You know the guard design. The unit is unplugged and cool.
Now you’re ready to actually clean.
What You’ll Need
| Tool / Material | Purpose | Notes |
|---|---|---|
| Soft-bristle brush | Dry debris removal | A clean pastry brush or soft toothbrush works well |
| Microfiber cloths (2–3) | Damp wiping and drying | Paper towels shred on mesh guards; avoid them |
| Mild dish soap | Cutting light grease | A single drop in warm water is enough |
| Baking soda | Tackling baked-on carbon | Forms a gentle abrasive paste |
| Small bowl of warm water | Dampening cloths | Keep it separate from the soap |
| Old soft toothbrush | Applying paste to tight spots | Dedicated cleaning brush, not your daily one |
| Flashlight or headlamp | Seeing what you’re doing | The interior ceiling is dark |
For Loose Debris and Light Dust
This is the easy one. Tilt the unit back, locate the visible crumbs and floury bits, and brush them downward with your dry soft-bristle brush. Work systematically from the back of the cavity toward the front opening.
Let everything fall onto the towel you laid down. Don’t brush debris sideways into the fan vents. Use a vacuum crevice attachment if you have one handy, but hold it an inch away from any openings.
Direct suction against a seal can damage delicate parts.
For Sticky Amber Grease
Fill your small bowl with warm water. Add a single drop of mild dish soap. Swirl to mix.
Dip a microfiber cloth in, then wring it out until no water drips when you squeeze. The cloth should feel cool and barely damp against your skin.
Wipe the heating element and the mesh guard in gentle, overlapping strokes. Focus on the guard first since that’s where most visible grease sits. Use a fingertip behind the cloth to press into the guard’s perforations slightly without forcing the fabric through.
For the coil itself, wrap the damp cloth around your index finger and run it along the top and sides of each loop. Never pull downward on the coil.
Rinse and re-wring the cloth as it picks up grease. You’ll see the amber residue transferring to the white cloth immediately. Keep going until the cloth comes away mostly clean.
Follow immediately with a dry microfiber cloth to remove any remaining moisture.
For Stubborn Carbonized Buildup
When the basic wipe doesn’t cut it, mix a paste. Two parts baking soda to one part warm water in a small ramekin. Stir until you get a spreadable consistency similar to toothpaste.
Apply the paste to the affected areas using your old toothbrush. Target just the carbon spots. Let it sit for 10 to 15 minutes.
Don’t let it dry out completely. The baking soda gently breaks down the polymerized grease without scratching the non-stick coating on the guard.
After waiting, dampen a clean microfiber cloth with warm water only. Wipe the paste away with smooth, single-direction strokes. You may need two passes.
For tight spots between the coil and ceiling, wrap the damp cloth around the toothbrush handle and slide it into the gap. Dry immediately once the residue is gone.
The Final Dry and Test Run
Once everything looks clean, go over every wiped surface with a fresh dry microfiber cloth. Leave the basket door or drawer wide open for at least an hour afterward. Air circulation finishes the drying that your cloth can’t reach in the crevices.
After an hour, plug the unit back in. Run it empty at 400°F for three minutes. Stand nearby and watch.
No smoke should appear. No chemical smell. Just hot air.
If you catch a faint whiff of baking soda, that’s harmless and disappears after the first real cook. If smoke returns, you’ve missed a patch. Unplug, cool, and spot-clean the offender.
The Fan Is Right There—How to Protect It While Scrubbing Above
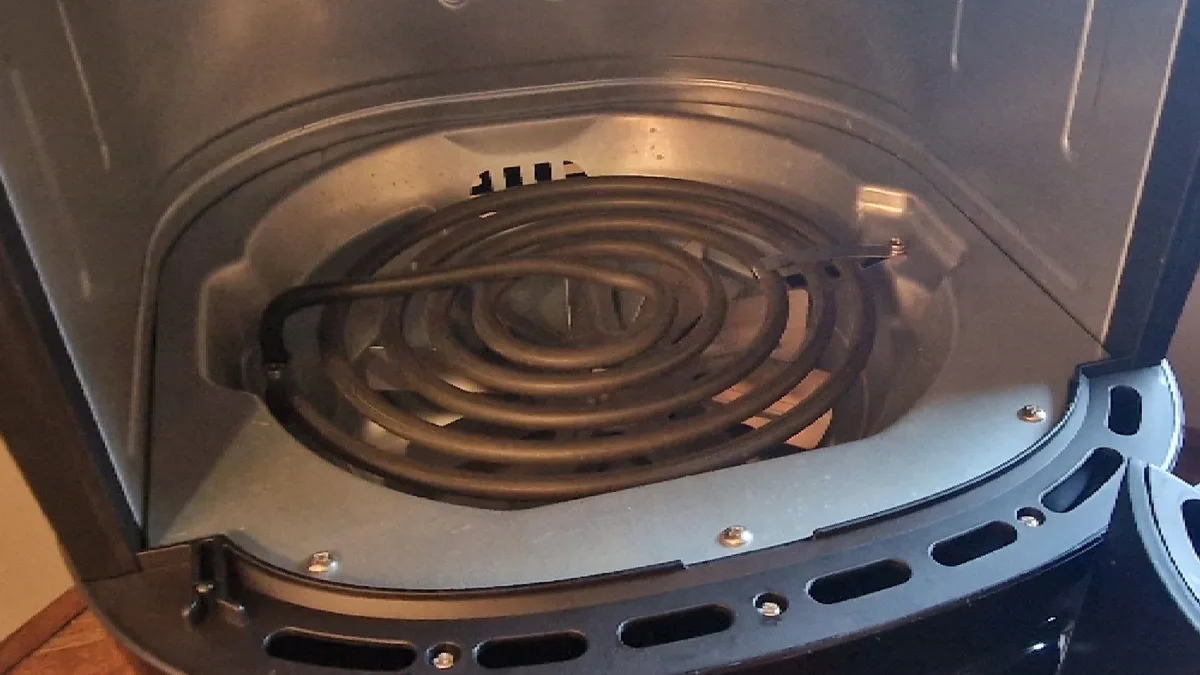
The circulation fan sits directly behind or beside the heating element in most air fryers. The opening is often protected by the same mesh guard you’re cleaning. But the gap around the fan housing can still let moisture in.
One wrong drip and you’ve sent soapy water into the motor bearings. That’s a dead appliance.
Lay a dry microfiber cloth over the fan opening before you start wiping the coil or guard above it. The cloth acts as a catch basin. Any errant drip from your damp cleaning cloth hits the dry fabric, not the fan.
Keep it in place throughout the wet-wiping stage.
When you’re cleaning the guard itself, never scrub in a motion that pushes liquid toward the fan. Work from the outer edges inward. Lift up, don’t press down.
If you’re using a paste, apply it sparingly. A little goes a long way. Too much and gravity pulls it exactly where you don’t want it.
Once the cleaning is done, remove the protective cloth carefully. Fold it inward so drips don’t spill. Check the fan opening with a flashlight.
If you spot any moisture, dab it with a dry corner of a cloth immediately. Leave the appliance open for that full hour of air-drying before plugging in.
When the Mesh Guard Won’t Budge: Workarounds for Fixed, Screwed, and Removable Covers
Some guards are held by tiny Phillips-head screws. Others are riveted or press-fit. Before you grab a screwdriver, flip through your user manual.
The manual will say plainly if removal is allowed. If it’s silent on the topic, assume the guard stays put.
For screwed guards, use a correctly sized screwdriver. Don’t strip the heads. Remove the screws slowly and place them in a small dish so none roll away.
Clean the guard separately under running water with dish soap. Dry it completely before reattaching. Never run the air fryer without the guard in place.
For fixed non-removable guards, you’re cleaning in position. Patience is your only tool here. The toothbrush method works well.
Dip the brush in your soapy water or paste. Scrub the perforations gently in circular motions. Follow with a damp cloth wrapped around a finger.
Press just hard enough to reach the surface, not hard enough to bend the metal.
If a guard is riveted and badly clogged beyond what you can reach, steam-loosening becomes your best friend. Place a small oven-safe ramekin filled with water in the basket. Run the air fryer at 300°F for eight minutes.
The steam will soften the grease inside the mesh holes. Unplug, cool for 15 minutes, then wipe. The gunk lifts far easier.
Common Visual Mistakes That Scratch, Soak, or Strip the Element
You can’t undo a scratched non-stick coating. So don’t use anything abrasive. Steel wool, green scouring pads, stiff-bristle grill brushes, all off limits.
Even a paper towel can snag on the mesh and leave behind tiny fibers that burn later. Microfiber is the safe choice.
Oversoaking is every bit as bad. A dripping wet cloth introduces water where it doesn’t belong. The coil bracket, the wiring terminals, the fan motor.
Wring the cloth until no water escapes. If you feel the urge to spray a cleaner, fight it. Decant the spray onto the cloth away from the appliance first.
Tipping the unit forward instead of backward seems minor. But gravity is not your friend here. Forward tilt sends any loose debris and moisture toward the control panel, not out the open cavity.
Always tilt backward. Let debris fall out onto the towel.
Finally, don’t overlook the ceiling itself. The flat panel above the coil accumulates a thin film of aerosolized oil. A quick wipe with the same damp cloth prevents that film from dripping back onto clean food.
Many people clean the coil beautifully and ignore the surrounding surface. Then they wonder why the smell lingers.
Expert Tricks for Gunk You Can’t Quite See Behind the Coil
There’s always a blind spot. The gap between the heating element tube and the ceiling metal is rarely visible without a mirror. But grease hides there.
A wooden chopstick with the tip wrapped in a damp microfiber cloth becomes the perfect tool. Slide it gently into that narrow channel. Run it side to side.
You’ll pull out residue you didn’t know existed.
For the spot where the element bracket meets the ceiling, gunk builds up in a hard-to-reach corner. A cotton swab dipped in baking soda paste reaches it without scratching. Use a fresh dry swab to wipe away the paste after ten minutes.
If the blind spots are repeatedly problematic, consider a preventative shift. Lining the basket with a parchment round or silicone mat reduces splatter that reaches the top. These won’t eliminate the need for cleaning the heating element, but they cut down the rate of accumulation significantly.
Less grease airborne means less gunk where you can’t see it.
How Often to Clean Based on What You Cook (and What You’re Seeing)
There’s no universal calendar. Your cooking habits dictate the schedule. If you air-fry wings, bacon, or burgers multiple times a week, a quick visual check every three uses is smart.
A full wipe-down might arrive every five to ten cycles. High-fat proteins are the fastest route to a smoking coil.
For those who mostly reheat frozen fries, roast vegetables, or bake in the air fryer, the interval stretches longer. These foods release minimal airborne oil. You might go a month without visible buildup.
Still, check monthly. The film might be thin but it’s there.
The clearest signal is your nose and eyes. Smoke during preheat means clean it now. A faint burnt smell even without visible smoke means clean it soon.
Don’t wait for the smoke alarm to make the decision for you. A two-minute wipe after a heavy cook is always easier than a 15-minute scrub on baked-on carbon later.
Frequently Asked Questions
Can I use oven cleaner on the heating element?
No. Oven cleaner is far too aggressive for an air fryer’s confined cooking cavity. The fumes can linger and transfer to food.
Stick with mild dish soap or a baking soda paste. Both cut grease without leaving toxic residue behind.
Why does my air fryer smell like burning plastic after I clean the element?
That smell usually means moisture or cleaning residue is still on the coil. A faint scent during the first empty run is normal. If it persists past two or three cooking cycles, unplug and re-wipe the element with plain water.
Then dry it thoroughly.
Will parchment paper liners stop grease from reaching the heating element?
Parchment rounds or silicone mats reduce splatter significantly, but they don’t stop it entirely. The fan still circulates tiny oil droplets upward. Using liners slows buildup.
You’ll still need to check the element periodically. A liner can help, but routine wiping still matters.
Should I clean the heating element before using a brand new air fryer?
Yes, a quick wipe is smart. Manufacturers sometimes leave a thin protective coating on the element. It burns off during the first use, which causes that odd new-appliance smell.
Wipe the cold coil with a barely damp cloth before the first cook. Then run it empty for a few minutes. Make sure you’ve placed the unit with proper clearance so airflow isn’t restricted during that burn-off.
What if the mesh guard is rusty?
Rust on the guard is a sign of trapped moisture. That often happens when the unit isn’t dried fully after cleaning. Light surface rust can be wiped away with a damp cloth and a tiny bit of baking soda.
Deep rust means the guard is compromised. Contact the manufacturer’s support before using the appliance again.


